Showing posts with label cheap. Show all posts

Monday, July 25, 2016

Where to Get Cheap Textbooks

college student find cheap textbooks

Textbooks are ridiculously expensive. I'm talking in the thousands for one semester. No, really. My first semester, I paid $978 for five textbooks because I didn't know where to get them. I don't want you to make the same mistakes I did, so I've compiled a list of the best websites to find your textbooks cheaper than you'll find them anywhere else.

  1. Amazon- Amazon is the first place I look for my books. You can usually find used books on Amazon really cheap. You can even rent books from Amazon.
  2. Chegg- On Chegg, you can save up to 90% on textbooks. You can also rent.
  3. ThriftBooks- An online used bookstore. They have all genres of books, but they also have textbooks.
  4. Directtextbook- Directtextbook is an online price comparison website that shows you where you can find the cheapest price for your book.
  5. Half.com- An Ebay company where you can find textbooks for half price.
  6. Ebay- Like Amazon, you can find used textbooks very cheap.
  7. Abebooks- A website where you can find used and new books for low prices.
Although most of the time, your books will be more expensive at on-campus bookstores, make sure to check anyway. Sometimes you can rent a book there cheaper than buying one used or they can price-match. Also, if you're waiting for your book to be delivered to you after you need it, don't forget to check out your campus library.

Still stressing about how expensive college is? Check out how to save money for college students and how to make money on the side.


Tuesday, July 19, 2016

Ole Henriksen Voxbox Review


Note: I received these products free from Influenster. All opinions are my own. If you want to find out how to get free products from Influenster click here.

The Ole Henriksen Voxbox came with:
  • Power bright system
  • Facial crème
  • Truth serum collagen booster
  • 2 cleansing sponges
Keep reading for the individual reviews of each product.

1.) Power bright system (Full product- $55)

The Power bright is a professional 3-step brightening system. It comes with a truth sugar glow polishing mask, truth 25% vitamin C concentrate, and pure truth melting cleanser.

Ole Henriksen power bright review


influenster voxbox
Steps in order from left to right


Here are the directions:
  1. Step 1: Apply truth sugar glow polishing mask to clean, damp skin, and leave on for 5-10 minutes. Add warm water and gently massage in circular motion, then rinse and pat dry.
  2. Step 2: Apply truth 25% vitamin C concentrate to dry skin. Leave on for 2-3 minutes. Treatment will begin to dry down slightly. Do not rinse off. Follow with step 3.
  3. Step 3: Apply pure truth melting cleanser directly on top of step 2 evenly over face. Do not add water. Expect a tingling feeling as the treatment is activated. Leave on for 10-15 minutes. To remove, dampen complexion sponges or wash cloth with lukewarm water and wipe gently to remove all product.
My opinion:

The first thing I thought when I was reading the directions was that it seems weird that using the facial cleanser was the last thing you do. It is also not so convenient if you don't have a lot of it, but it is definitely worth it. The Power bright system smells amazing- like oranges. The first step exfoliated your face, and it does a good job. Step 2 makes your face feel so soft. I could see an immediate difference in my face. It made my face smoother and brighter. I can honestly say I've never seen a product that gives me a healthy glow without making me oily, and this did just that. It also seemed to minimize some of my larger pores. I probably won't be buying it because it's a lot of money for me, but if you have the money, it's definitely worth investing in.

2.) Facial creme (Full size-$38)
.5 oz. oil-free moisturizer that evens skin tone, moisturizes, and fades dark spots.

Ole Henriksen sheer transformation review


Directions:

1. Apply evenly to face and neck day and night.

My opinion:

At first it seemed like it was greasy, which is not ideal for an oily-skin gal like me. However, I waited it out to see how it would do. I'm not sure what exactly happened, but it seemed like my skin absorbed the product instead of just sitting on the surface. It wasn't greasy anymore, and my skin felt amazing. It doesn't really have a smell. My face never got oily, but retained just the right amount of moisture. AND it's vegan. I highly recommend the Ole Henriksen facial creme.

3.) Truth serum collagen booster (Full size-$48)
.5 oz. vitamin C serum that helps collagen and evens skin tone.

Beauty truth serum for face


Directions:

1. In the morning, apply to face and neck.
2. Follow with moisturizer.

My opinion:

My original thought when I saw that it was a serum was, "Oh great. That's gonna make me oily." These products feel like they will make you oily, but they really don't. They absorb into your skin pretty fast. This seemed to tighten to my face up and make some of my pores smaller. It smells good, like the other products. However, it didn't seem to brighten my face as much as the
Power bright system. It says that it helps lighten dark spots, but I will have to update you on that because I've only used it 2 times. You can probably find something that tightens your skin like this for cheaper, so I would probably go that route. The full size is only 1 oz., so I definitely don't think it's worth the price, although it does work well.

4.) Ole Henriksen Complexion Sponges ($7)
2 complexion sponges used to exfoliate and can be used for 1-3 months.

Free voxbox from influenster
Free products


Directions:
1. Run under water to expand sponge.
2. Use as needed with daily cleanser or special treatment.

My opinion:

To be honest, there is not really a lot to say about these sponges. They are just normal sponges. It is cool because they come completely compressed, but when you soak it in water, it expands. It claims that it is used to exfoliate, but I don't feel like it exfoliates. It's a good cleansing sponge; don't get me wrong, but it probably should be used on the days you don't need to exfoliate. I personally like using facial brushes better than sponges.

My opinion overall:

All of the Ole Henriksen products did just what they said: brighten, boost collagen, and even skin tone. Although they did improve my face tremendously, there are still probably cheaper options out there that are just as good. The Ole Henriksen products are a little more on the expensive side, but if you're willing to invest some money into products that actually work, I would go for it.


Saturday, July 9, 2016

DIY Summer Wreath

Looking for a summer project that's easy and inexpensive? You're at the right place. This wreath is perfect for summer, and you could even keep it up through all of the other seasons too. Keep reading to find out how to make it.


Materials:
  • Tree branch wreath (Not sure what it's officially called)
  • Floral bush (I found some at a dollar store)
  • Burlap bow (6 in.)
  • 3/8 in. ribbon
Instructions:
  1. Take your floral bush and cut it so that the flowers aren't all attached to one stem. Cut off all of the main stems so that they are separate. 
  2. Take the larger flowers and push the floral wire in and around the twigs so that it is secure, but not sticking out in the upper left part of the wreath. Make about 3 big flowers side by side.
  3. Take one stem of smaller flowers and put them on each side of the three larger flowers.
  4. Tie a normal bow in the burlap without cutting it first to see how big you want the bow. After you know how long to make your burlap, cut it and tie into bow.
  5. Place bow on lower right side of the wreath.
  6. Cut ribbon into about three 2 in. segments.
  7. Take the cut ribbon through the holes in the backside of the burlap bow and secure in a knot to the wreath. Secure the ribbon on both ears of the bow as well as the middle.


That's all! It's probably the easiest wreath you'll ever make, and it's perfect for summer!

Wednesday, June 29, 2016

Fourth of July Nails


If you're like me, it's a struggle to paint your nails. I can barely get a coat of plain nail polish on, let alone paint a design. However; I found that I could do super cute 4th of July nails without all of the difficult designs. With these nails, all it takes it two coats of paint, but it still incorporates red, white, and blue.

First, I chose to paint all of my nails except my ring finger this red color. This nail polish is by Sinful Colors and the name is Ruby Ruby (#369).
Sinful Colors Ruby Ruby (#369)

Next, I painted my ring fingers with this gorgeous blue color by Pure Ice. The color is French Kiss (#538).
Pure Ice French Kiss (#538)

Lastly, I covered all of my nails in this gorgeous glitter clear coat by Revlon that has different sizes and shapes of red and white glitter. The name of this nail polish is Daring Graffiti (#678).
Revlon Daring Graffiti (#678)

That is all I did to get these 4th of July nails. Most of the holiday designs are complicated, but it doesn't have to be. This nail idea is perfect even if you don't have a lot of time.


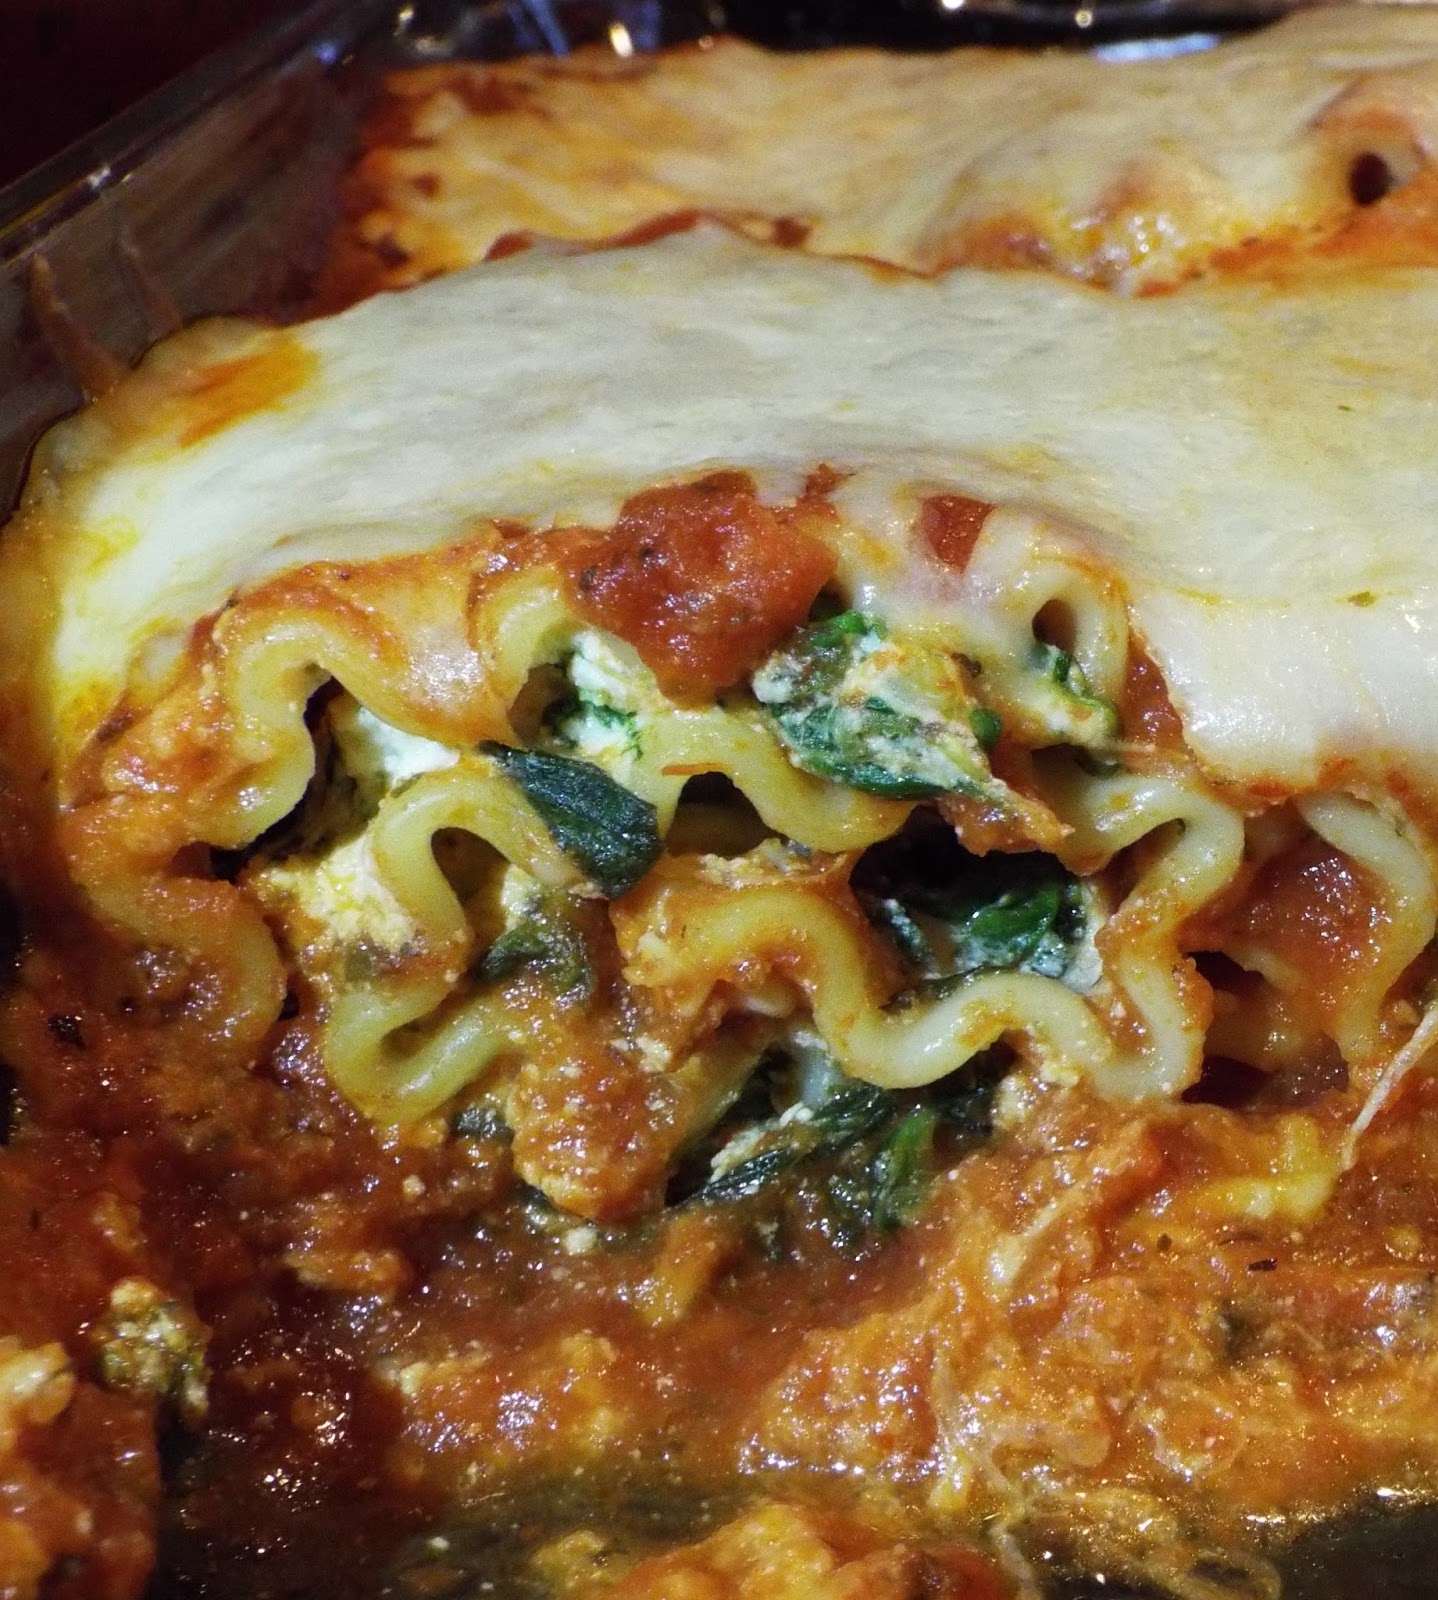
Lasagna Rolls Recipe

Lasagna sounds difficult to make, which is why I don't have it often. When I'm craving lasagna, I typically just opt for a microwave dinner. This is the easiest lasagna recipe I've found, and it is just as delicious. You can even make it a skinny dish by using fat-free or low-fat cheese. Continue reading to find out how to make these delicious lasagna rolls.


Serves: 9

Ingredients:
  • 9 lasagna noodles (cooked and dried)
  • 24 oz. spaghetti sauce
  • 10 oz. frozen chopped spinach (thawed and drained)
  • 1/2 cup preferred shredded cheese (I used 4 cheese blend)
  • 15 oz. ricotta cheese
  • 9 tbs. preferred shredded (I used Mexican cheese blend)
  • 1 egg
Instructions:
  1. Let spinach thaw according to instructions. Make sure to drain.
  2. Preheat oven to 350 degrees.
  3. Cook lasagna noodles according to package instructions and let dry. Noodles will still feel a little sticky when dry.
  4. Combine spinach, egg, 1/2 cup of shredded cheese, and ricotta in medium bowl.
  5. Spoon just enough spaghetti sauce to cover the bottom of a 9x12 baking dish so the lasagna will not stick.
  6. Lay out lasagna noodles on wax or parchment paper and spread spinach ricotta mixture evenly over each noodle.
  7. Roll up the lasagna noodles and place seam down in baking dish.
  8. Spoon the spaghetti sauce over each lasagna roll.
  9. Top each lasagna roll with 1 tbs. of preferred shredded cheese mixture.
  10. Cover with foil and bake for 40 minutes or until cheese melts.


                        That's all, folks! There is your easy and delicious lasagna roll recipe.


Wednesday, June 15, 2016

Best Drugstore Lipsticks

      Decent drugstore lipstick can be hard to find. Most of it wears off within the first hour and just doesn't have a good formula. I have created a list of my favorite drugstore lipsticks that are almost or just as good as the high-end lipsticks in my favorites shades. These lipsticks/ lip glosses do not dry out my lips and stay on for a long time considering the price. Keep reading to see what they are.

The swatches and lipsticks are in the same order as the list from left to right

1.) "Elf Jumbo Lip Gloss Stick" in the color Movie Star ($2.00)

2.) "Wet n' Wild Silk Finish Lipstick" in the color Dark Wine ($4.99)

3.) "Elf Jumbo Lip Gloss Stick" in the color Pink Umbrellas ($2.00)  

(Note: I realize that I already mentioned this exact product in a different color, but I think this is another perfect color for summer, so I just wanted to throw it out there.)

4.) Maybelline Color Sensational Creamy Mattes Lip Color in the color Touch of Spice ($5.22)

5.) Elf Matte Lip Color in the color Praline ($3.15)

Monday, May 30, 2016

Fruit Pizza Recipe


This delicious dessert is perfect for a hot summer day. It's super easy to make and perfect for any holiday!


Prep time: 30-45 minutes
Cook time: 15 minutes
Total time: 45- 60 minutes


What You'll Need:

  • One package of sugar cookie dough and the ingredients needed according to the package (usually one egg and a stick of butter)
  • 8 oz. package of cream cheese
  • 1/2 cup of sugar
  • 1 tsp vanilla extract
  • 1 container whipped cream
  • Assorted fruits (I used strawberry and kiwi)

Instructions:

  1. Prepare and bake sugar cookie dough according to instructions on the package. Instead of making cookies, press the dough onto the entire baking sheet. Remember to add aluminum foil and cooking spray!
  2. To make your topping, blend cream cheese, sugar, and vanilla extract in medium bowl.
  3. Fold whipped cream into mixture.
  4. When the sugar cookie dough you baked is completely cool, you can spread the topping throughout the sugar cookie crust.
  5. Dice assorted fruits and add evenly to fruit pizza.


It's as simple as that! Enjoy your delicious dessert!

Monday, March 28, 2016

Best Drugstore Eyeshadow Palette


Here lately, I have really been wanting an eyeshadow palette with more of a pink tint. I would love love love to get the Naked 3 palette by Urban Decay, but I really wanted to try something a little less expensive. I decided to try the Wet n' Wild Au Naturel Eyeshadow Palette in Nude Awakening. The price was $5.99.

Let me just say, I was pretty worried about the pigmentation. Other times that I have tried drugstore eyeshadows, I had to keep putting it on and keep putting it on, and it still would not show up. This, however, has great pigmentation. This may be my new favorite palette. Here are the swatches of each eye shadow:
The lighter colors are hard to see because of my pale arm (sorry about that). However, when put on an actual eye shadow primer and next to a darker crease color, they show up very well on the lid. I washed my arm a couple of times and took a shower, and the four darkest colors WOULD NOT come off of my arm. That's how good it stayed on. My favorite color out of the whole palette is the mauve color. That's actually why I got it. Some of the colors are matte and some are shimmery. Most of the light colors are shimmery ones, and the darker ones are matte.

Now, onto the cons of this palette.

A couple of the colors were a little too orangey for me, and they washed me out; however, this does not mean it will be like that for everyone. Here is a close up of the colors:


I can say in all honesty, that the orangey colors was the only con about this palette, but it is not a con for everyone because warm colors suit other skin tones better than mine . Overall, I really think this palette is worth looking into it. I suggest you give it a try!

Saturday, February 13, 2016

Cheap Skincare for Acne

Everyone once in a while, I break out pretty bad. Especially being a college student because I stress out so often. I also break out really bad when I am about to start my period. I have always struggled to keep my breakouts under control when they do happen, but I recently came across a routine that helps prevent it to some extent. Actually, it helps quite a bit for me. Of course, everyone's body isdifferent, so I don't know if this will help YOU or not, but you can at least give it a go.

First things first. Here are the products I use when I am not broke out:
Now, for what I use when I am broke out. Please keep in mind that it is usually only mild breakouts that I have. This product works miracles, so maybe it will for you too. When I am broke out, I use the Equate 3-step Acne Treatment
This treatment comes with a cleanser, toner, repairing lotion, and mask (not pictured).  You use them in that order, except the mask (obviously). The cleanser is an exfoliator, so it will remove dead skin. All of the products have the same chemical that is supposed to help with breakouts, so it continues to work after you wash it off. It is compared to proactive, but for about half the price.

Another product that I use to help is Equate Spot Treatment. I just put it directly on my breakout, and it dries it up.

Lets say, you don't want to use these specific products (even though you should). I'll give you a little secret. The chemical in all of the products that actually help my breakouts isn't salicylic acid, which is what is in most skincare products. Salicylic acid actually makes it a lot worse for me. What DOES help is  benzoyl peroxide, so be on the lookout for that.

Hope you enjoyed the post, and have a great day!