Monday, July 25, 2016

Where to Get Cheap Textbooks

college student find cheap textbooks

Textbooks are ridiculously expensive. I'm talking in the thousands for one semester. No, really. My first semester, I paid $978 for five textbooks because I didn't know where to get them. I don't want you to make the same mistakes I did, so I've compiled a list of the best websites to find your textbooks cheaper than you'll find them anywhere else.

  1. Amazon- Amazon is the first place I look for my books. You can usually find used books on Amazon really cheap. You can even rent books from Amazon.
  2. Chegg- On Chegg, you can save up to 90% on textbooks. You can also rent.
  3. ThriftBooks- An online used bookstore. They have all genres of books, but they also have textbooks.
  4. Directtextbook- Directtextbook is an online price comparison website that shows you where you can find the cheapest price for your book.
  5. Half.com- An Ebay company where you can find textbooks for half price.
  6. Ebay- Like Amazon, you can find used textbooks very cheap.
  7. Abebooks- A website where you can find used and new books for low prices.
Although most of the time, your books will be more expensive at on-campus bookstores, make sure to check anyway. Sometimes you can rent a book there cheaper than buying one used or they can price-match. Also, if you're waiting for your book to be delivered to you after you need it, don't forget to check out your campus library.

Still stressing about how expensive college is? Check out how to save money for college students and how to make money on the side.


Sunday, July 24, 2016

Dorm Room Ideas

tumblr preppy dorm DIY
Buying everything for your dorm can be nerve-wracking because it's so expensive, and there's so much to buy. I made my dorm bedding for cheaper than you can buy it, and you can too! Keep reading to find out how.

I saw lots of cute dorm bedding ideas on Pinterest, but they were all so expensive; at least $150 each just for bedding. I made my dorm bedding for half of that price. Let me just go ahead and say that I got a cheap reversible comforter at Walmart for $20. I also bought the sheets, but the rest of it I made, and that's what really brought it together.

The folded blanket on my bed is the main project for this post. I took a cotton fabric that I wanted to coordinate with my room and made it into a blanket. If you want to have this preppy style to your dorm, you should probably have 2-3 colors you can coordinate. I chose navy and coral/pink. Most twin size comforters are around 66"-68". That will be the length of your blanket. The width is whatever you want it to be. I cut out two pieces of the fabric. Lay one piece down, right side up. Lay the other one on top, right side down. Next, cut batting to the size of the fabric, and lay it on the top. Pin all the way around the blanket, and sew all except one side. It's hard to sew batting to fabric, but if you add tissue paper on top, it helps. Now turn the blanket inside out and sew the part you left open. There is your blanket to polish the look of your dorm!

I got navy sheets to match my comforter, but I also used them for something else; a bed skirt. In order to make a bed skirt, all you have to do is get a twin size flat sheet and either put it under your mattress, or where your sheet normally goes and just don't tuck it in. It really puts together your room because you can't see everything that's stuffed under your bed.

Keep an eye out for detailed posts coming about my décor and how I made my pillows.


Wednesday, July 20, 2016

What I wish I Would Have Known as a Freshman


1.) You probably won't stay friends with most of your high school besties.

2.) I know homework is important, but you need to take time for yourself. Going out and having fun keeps a healthy balance.

3.) Stop saying no. When my friends would ask if I wanted to do something, no was my go to answer. I always had homework I wanted to get done, when really it could have waited.

4.) Try to keep up a healthy lifestyle. It's hard when all you want to do is cry and eat chocolate and ramen noodles, but you'll feel better in the long run if you try to be healthy.

5.) Ask for help if you need it. I'm really bad for not asking for help because I don't want to seem stupid. However, most professors will understand. It's better to feel stupid than to get a bad grade because you was too stubborn or embarrassed to ask.

6.) Take advantage of student discounts. There's no explanation for that.

7.) Go out of your comfort zone. I went to some activities on campus that I normally wouldn't go to by myself, which is totally out of my comfort zone. By doing that, I made some great friends, so don't be afraid to try something new.

8.) Procrastination is the devil. Waiting until last minute will just make it harder on yourself.

9.) Take classes that will interest you. You might have your mind set on a major, but try out classes that sound interesting. They might even make you want to change your major.

10.) It's okay to change your major. Yeah, that might put you a little behind. What's getting a year or so behind compared with the rest of your life with a job you can enjoy?

11.) Go to at least one sporting event. It can be fun, and you may even get a free t-shirt.

12.) Keep common medicine. Getting a headache and having to go all the way out to Walmart for medicine isn't fun.

13.) Take advantage of free food. In the long run, it can save you quite a bit of money.

14.) I know it seems like it's dragging by now, but when you look back, it goes by in the blink of an eye. Don't take it for granted.

Tuesday, July 19, 2016

Ole Henriksen Voxbox Review


Note: I received these products free from Influenster. All opinions are my own. If you want to find out how to get free products from Influenster click here.

The Ole Henriksen Voxbox came with:
  • Power bright system
  • Facial crème
  • Truth serum collagen booster
  • 2 cleansing sponges
Keep reading for the individual reviews of each product.

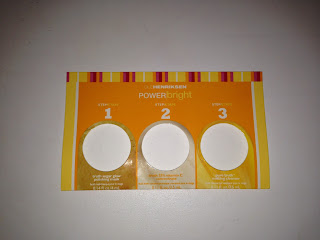
1.) Power bright system (Full product- $55)

The Power bright is a professional 3-step brightening system. It comes with a truth sugar glow polishing mask, truth 25% vitamin C concentrate, and pure truth melting cleanser.

Ole Henriksen power bright review


influenster voxbox
Steps in order from left to right


Here are the directions:
  1. Step 1: Apply truth sugar glow polishing mask to clean, damp skin, and leave on for 5-10 minutes. Add warm water and gently massage in circular motion, then rinse and pat dry.
  2. Step 2: Apply truth 25% vitamin C concentrate to dry skin. Leave on for 2-3 minutes. Treatment will begin to dry down slightly. Do not rinse off. Follow with step 3.
  3. Step 3: Apply pure truth melting cleanser directly on top of step 2 evenly over face. Do not add water. Expect a tingling feeling as the treatment is activated. Leave on for 10-15 minutes. To remove, dampen complexion sponges or wash cloth with lukewarm water and wipe gently to remove all product.
My opinion:

The first thing I thought when I was reading the directions was that it seems weird that using the facial cleanser was the last thing you do. It is also not so convenient if you don't have a lot of it, but it is definitely worth it. The Power bright system smells amazing- like oranges. The first step exfoliated your face, and it does a good job. Step 2 makes your face feel so soft. I could see an immediate difference in my face. It made my face smoother and brighter. I can honestly say I've never seen a product that gives me a healthy glow without making me oily, and this did just that. It also seemed to minimize some of my larger pores. I probably won't be buying it because it's a lot of money for me, but if you have the money, it's definitely worth investing in.

2.) Facial creme (Full size-$38)
.5 oz. oil-free moisturizer that evens skin tone, moisturizes, and fades dark spots.

Ole Henriksen sheer transformation review


Directions:

1. Apply evenly to face and neck day and night.

My opinion:

At first it seemed like it was greasy, which is not ideal for an oily-skin gal like me. However, I waited it out to see how it would do. I'm not sure what exactly happened, but it seemed like my skin absorbed the product instead of just sitting on the surface. It wasn't greasy anymore, and my skin felt amazing. It doesn't really have a smell. My face never got oily, but retained just the right amount of moisture. AND it's vegan. I highly recommend the Ole Henriksen facial creme.

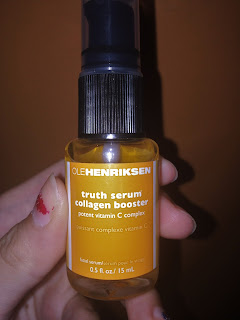
3.) Truth serum collagen booster (Full size-$48)
.5 oz. vitamin C serum that helps collagen and evens skin tone.

Beauty truth serum for face


Directions:

1. In the morning, apply to face and neck.
2. Follow with moisturizer.

My opinion:

My original thought when I saw that it was a serum was, "Oh great. That's gonna make me oily." These products feel like they will make you oily, but they really don't. They absorb into your skin pretty fast. This seemed to tighten to my face up and make some of my pores smaller. It smells good, like the other products. However, it didn't seem to brighten my face as much as the
Power bright system. It says that it helps lighten dark spots, but I will have to update you on that because I've only used it 2 times. You can probably find something that tightens your skin like this for cheaper, so I would probably go that route. The full size is only 1 oz., so I definitely don't think it's worth the price, although it does work well.

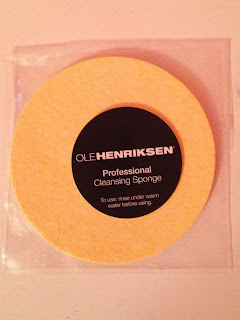
4.) Ole Henriksen Complexion Sponges ($7)
2 complexion sponges used to exfoliate and can be used for 1-3 months.

Free voxbox from influenster
Free products


Directions:
1. Run under water to expand sponge.
2. Use as needed with daily cleanser or special treatment.

My opinion:

To be honest, there is not really a lot to say about these sponges. They are just normal sponges. It is cool because they come completely compressed, but when you soak it in water, it expands. It claims that it is used to exfoliate, but I don't feel like it exfoliates. It's a good cleansing sponge; don't get me wrong, but it probably should be used on the days you don't need to exfoliate. I personally like using facial brushes better than sponges.

My opinion overall:

All of the Ole Henriksen products did just what they said: brighten, boost collagen, and even skin tone. Although they did improve my face tremendously, there are still probably cheaper options out there that are just as good. The Ole Henriksen products are a little more on the expensive side, but if you're willing to invest some money into products that actually work, I would go for it.


Wednesday, July 13, 2016

How to Get a Voxbox

If you're reading this right now, you may have heard of Influenster or of a voxbox. Influenster is a product discovery and reviews website. Influenster gives FREE products out to so many people who qualify, which is known as a Voxbox. Yes, this is a legitimate website. I received two free products just two weeks after I signed up. Keep reading to find out how to qualify for a voxbox.


Whether you receive a Voxbox or not depends on your social impact score and your completion of badges. Hang on and I'll explain. Your social impact score is determined by how many followers you have on social media On Influenster.comor the Influenster app, you can access your social impact score and connect all of your social media accounts to Influenster. You can also boost your social impact score by adding an Influenster widget to your blog or inviting a friend. Some campaigns, which are opportunities to get a Voxbox, will require you to complete badges. Badges are a varying number of tasks you must complete. An example of tasks would be to write a review, create a list, or answer a question.

Now lets get into exactly what you can do to increase your chance of getting a voxbox.
  1. Connect all of your social media accounts. Remember, the more followers or friends, the merrier.
  2. Fit the demographics. This is something you can't really help, but some campaigns require you to take a survey to see if you would be a good fit for the product.
  3. Be active on Influenster. Some things you could do would be:
  • Complete badges
  • Write a review
  • Complete snaps
  • Create a list
  • Ask questions
  • Answer questions
That's all, folks. The best thing you can do that will boost your impact score is having a decent-sized social media following because that's what Influenster is about: getting products out there. Good luck!

Monday, July 11, 2016

How to be Happy


  1. Take pleasure in all of the small things.
  2. Realize how small you actually are in this big world.
  3. Know whatever you're going through is just a  small segment of your life span.
  4. Change your way of thinking. If you catch yourself thinking something negative, try to turn it into something positive.
  5. Stop complaining. It's easy to find the bad in something. Take the road less traveled and find the good.
  6. Don't worry about what other people think.
  7. Don't worry about the past.
  8. If you're not in a good mood, put yourself in one.
  9. Get lost in a book.
  10. Watch a happy movie.
  11. Do something nice for someone.
  12. Play with a pet.
  13. Go with the flow. It's okay as it is. It doesn't always have to be how you think it should be.
  14. Get more sleep.
  15. Meditate.
  16. Spend time with people you care about.
  17. Find hobbies that make you feel good.
  18. Learn to love yourself.
  19. Find the time to relax.
  20. Enjoy nature.
  21. Don't be afraid of new experiences.
  22. Be grateful. Know that someone will always have it worse than you. It's not as bad as it seems.
  23. Have a good attitude.
  24. Let go of things and people that are holding you down.
  25. Always smile. Be the person who smiled and didn't get a response, not the one who didn't smile back.
  26. Disconnect from social media. Seeing all of the negative can affect your way of thinking.
  27. Dance to your favorite song.
  28. Find something that inspires you.
  29. Don't compare your life to others.
  30. Be present in everything you do. 
  31. Get up early.
  32. Get things done.
  33. Know that happiness doesn't necessarily come from material things.
  34. Find a job you love.
  35. Be healthy. Your physical health can have a factor in your emotional health.
  36. Know that everything will be okay.

Saturday, July 9, 2016

DIY Summer Wreath

Looking for a summer project that's easy and inexpensive? You're at the right place. This wreath is perfect for summer, and you could even keep it up through all of the other seasons too. Keep reading to find out how to make it.


Materials:
  • Tree branch wreath (Not sure what it's officially called)
  • Floral bush (I found some at a dollar store)
  • Burlap bow (6 in.)
  • 3/8 in. ribbon
Instructions:
  1. Take your floral bush and cut it so that the flowers aren't all attached to one stem. Cut off all of the main stems so that they are separate. 
  2. Take the larger flowers and push the floral wire in and around the twigs so that it is secure, but not sticking out in the upper left part of the wreath. Make about 3 big flowers side by side.
  3. Take one stem of smaller flowers and put them on each side of the three larger flowers.
  4. Tie a normal bow in the burlap without cutting it first to see how big you want the bow. After you know how long to make your burlap, cut it and tie into bow.
  5. Place bow on lower right side of the wreath.
  6. Cut ribbon into about three 2 in. segments.
  7. Take the cut ribbon through the holes in the backside of the burlap bow and secure in a knot to the wreath. Secure the ribbon on both ears of the bow as well as the middle.


That's all! It's probably the easiest wreath you'll ever make, and it's perfect for summer!

Wednesday, July 6, 2016

Bad Branch Falls

On September 6, 2015, I took my first trip to Bad Branch Falls with my family. Although the water was pretty low so it wasn't much of a waterfall, it was still breathtakingly beautiful. The trip wasn't planned, so I wasn't dressed for the occasion. The hike was pretty difficult for me in several areas as it went uphill. Jeans and dress boots didn't help. I guess you could say I took the beauty of the hike for granted because all I could keep thinking was, "Are we there yet?" When we did reach the falls, we left just a few minutes after admiring it. I returned for my second trip on May 13, 2016 with my boyfriend and his friend. This time I was prepared. The hike is absolutely beautiful, but the best part was indeed the falls. We ended up staying an hour or so, just relaxing in hammocks. There had been a lot of rain lately, which meant Bad Branch Falls was more than just some water dripping off of a rock. The 1.2 mile hike was definitely worth the view. Here are some pictures.


Monday, July 4, 2016

Not Flexible enough for Yoga?

      When I first heard (and saw) about yoga on the internet, I just scrolled and moved on. Want to know why? All of the poses I saw led me to believe that I wasn't flexible enough. I didn't start yoga until a couple years later, but looking back, I wish I would have started sooner. I'm sure there are a lot of people in the same boat I was in. I don't want anyone else missing out on the amazing art of yoga just because of a common misconception. No, you do not have to be flexible to do yoga. Here is why:

      First of all, most of the pictures on the internet are of people who have been practicing for years or was already flexible from other sports or activities. Do not compare yourself to anyone else, in yoga or in life. Compare your old self to your new self. Yoga is your own personal journey, so don't be down if you can't get something the first time or even the thousandth time. Yoga takes practice, just like anything else.

    Yoga poses are only a small part of yoga. Most people do not do yoga just for flexibility. There are other things you can focus on as well such as breathing. Yoga is about whatever you want it to be about. You could be doing yoga to achieve peace, lower stress, or for any other benefits. Even if you do want to focus on poses, you don't  have to get into all of the pretzel-looking ones. It's okay if you can't do basic stretches. You can always modify to fit your personal needs. Like I said earlier, yoga is your own journey, so don't be too hard on yourself if you've yet to accomplish a goal such as touching your toes.

    When I started yoga, part of the reason was that I wanted to get flexible. And guess what? I did. Looking back, not doing yoga because I wasn't flexible seems silly because yoga itself will help you gain flexibility. If you aren't flexible, yoga is EXACTLY what you should be doing. No, you may never be able to touch your toes or do the splits. So what? Yoga is about much more than flexibility. Yoga is about personal growth.

So don't be scared to go to class or do yoga at home because you're afraid you're not flexible enough. There is no such thing as "not flexible enough" in yoga.


Saturday, July 2, 2016

Sunburn Remedies


Hey everyone! I started a new blog over at Thriving Wonders. Please go check out my blog! I have this exact post (but much better) over there! :)

I'm sure almost everyone knows the dangers of getting a sunburn. Sometimes that just isn't enough to keep it from happening. Whether you're trying to tan, or just got exposed to the sun without thinking about it, here are some ways you can heal your sunburn fast.
  1. One obvious way is to use sunscreen in the first place. Yes, this doesn't actually HEAL sunburn, but the less burnt you get, the easier it will heal. You may tend to skip the sunscreen in order to tan, but you don't need to. You can tan with sunscreen without getting burnt so bad.
  2. Apple cider vinegar is a great remedy for sunburn. Take a washcloth or paper towel, put some apple cider vinegar on it, and gently dab it on your burn.
  3. Coconut oil is another amazing remedy for sunburn. Dampen your skin with a cool washcloth and apply coconut oil to the burn.
  4. Black tea also helps sunburn. Put 3-4 tea bags in a glass of lukewarm water, dip your washcloth in it, and apply it to your sunburn.
  5. Aloe Vera provides instant relief for burns. I buy an aloe Vera gel in store, but you can also apply it directly from the plant.
  6. If you don't have aloe vera, just remember to keep your skin moisturized. Your skin is damaged, which tends to dry it out.
  7. Take cool showers. Never take a hot shower with a sunburn! The cool shower will help soothe the burn.
  8. Don't use harsh soaps. Soaps with a lot of chemicals will dry out your skin even further. Try finding a soap with natural ingredients. I use Neutrogena naturals.
With all of these remedies, you should definitely be able to heal your sunburn. Some of these take a little more time than others, but some will heal your sunburn overnight. Good luck!